Electronics, Deck and Superstructure. The
Hull interior
Now it was time to install the power systems, electronics and other goodies that go
inside. I decided to go with two speed controls. The USS NEWPORT NEWS had four screws. By
having one speed control for the port propellers and another speed control for the
starboard propellers, it made this investment worth every cent. By placing one speed
control in reverse and the other in forward, this 5-foot model can rotate on its center
axes, turning around in an area only a few inches greater than its length.
The motors are powered by two standard 7.2 volt battery packs wired in parallel. There is one 12-volt battery that supplies power to everything except my motors. A 12-volt fan is located at forward midship that blows across the electric speed controls and circuit board to keep them cool. I have a car's windshield washer pump mounted in the aft section of the ship. To suck water up from two outlets in the bottom of the hull and pump water out through eight bilge pump holes on the sides of the hull. My wife is still wondering why one of the windshield washers on her car does not work anymore!
Using information gathered at club meetings and out of hobby magazines, I built a circuit board using Radio Shack parts that reduced my 12-volt battery down to 5-volts Plus to two variable controlled outputs. 12-volts come into this device and transistors split it into three different voltage outputs. The first outlet is 5 volts and is used to replace the battery for my receiver. The other two outlets have an adjustable pot on them to allow me to adjust the voltage down to 3 volts and 1.5 volts to run assorted lights through out the ship.
I created a "built in battery/voltage tester" mounted on the control board. This unit is also made from parts purchased from Radio Shack. I used a DC voltmeter (part # 270-1754) and a 6-position rotary switch (part # 275-1386). To the separate positions of the switch, I connected the 12-volt battery to position #2, the 7.2 batteries to position #3, my first adjustable output to position #4, and the second variable voltage outlet to position #5. Position #1 and #6 of the switch have nothing wired to them and are used as "OFF" positions. By turning the rotary switch to the correct position, I can easily check any of my batteries or use this device to adjust my variable voltage outlets to the desired voltage. Some would not call this a unique invention because it does not do anything a voltage tester or a battery tester would do. However, because this device is located inside the hull, this voltage tester is always ready to use and it looks great mounted on the control board of the ship.
The Deck and Superstructure.
The three sections of the deck are made out of 1/8" birch 3 ply model aircraft
plywood. I wanted the deck to fit snug into the hull's deck frame so I cut each section
out to be about 1/32" larger than needed. Then I carefully hand sanded the sides of
each section, constantly checking it until they fit perfectly into the deck frame created
when I was making the hull. When I was finished, I had 3 pieces of deck that, when laid
into the hull deck frame, fit so tight enough that there is no water leakage.
The superstructure was made mostly of balsa wood. I made a "balsa primer" by mixing 30% baby powder with 70% Pactra's Red Aero Dope, a couple of coats of this mixture and some sanding with a very fine sandpaper made a finish as smooth as those who used styrene plastic. The masts were made of brass tubing topped off with styrene plastic and assorted model parts left over from car, boat, airplane models that my two sons had made over the years. (Never throw that stuff away! Right?)
Bridge and lighting
To get a "windows" effect at the front of the bridge, I used a clear
styrene plastic over the front of the bridge structure. Then I cut 3/16" squares out
of "detailing masking tape" and placed them onto the clear plastic in two
straight rows, leaving 1/16" between each window. After spray painting the bridge, I
then removed the little pieces of tape and there were the windows. A bright 3 volt light
bulb was installed inside the hollow bridge so that when I turn on the lighting system,
the light shines through the windows. I also have little men standing at the windows that
really look great with the light shining behind them. The bridge is removable which allows
me to work on the electrical part of the bridge. At the top of each mast is a LED with the
wiring going down through the brass tubing to the electrical connections. Appropriate
colored LEDs were put throughout the ship. Running this ship at night is a lot of fun.
Antennas
This ship had a large number of antennas located all over the ship! Whip antennas
sticking out from everywhere. Four antennas are mounted on the smoke stack, antennas
mounted on top of some of the main gun mounts, antennas sticking out all over the bridge.
There is a massive antenna conglomeration on the bow.
The whip antennas were easy to build. A little piano wire stuck into a small piece of plastic to function as it's base then glued to the appropriate place on the superstructure. The massive antenna system on the bow of the ship was much more demanding. This took many hours of soldering brass tubing, string silver thread and gluing together assorted other materials found around the garage.
Turrets, detailing and the crew. The 8"
Main Gun Turrets
The main gun turrets are made out of balsa wood. The gun barrels were sanded out of
oak dowels by placing one end of the dowel into a power drill and sanding them into the
shape of gun barrels.
I found some extremely small straight pins and stuck them in a straight line along
the top outer edge of the turret's roof to simulate rivets. To permit the turrets to
rotate, I used servos mounted directly under the gun mounts of my #1 and #3 main turrets.
By adding a "Y" adapter to one of the receiver channels allows me to rotate both
turrets in unison. I have mixed feeling about the system I developed for rotating the
turrets. On the bad side, the servos will not rotate a full 100 degrees in each direction
that I would have liked to have accomplished. On the other hand, this was a very easy
installation and I don't have to worry about the turrets rotation so far around that the
barrels get knocked off by superstructure behind them.
Detailing
Much of the detail on this ship is just found around the house. The Public Address
system throughout the ship was made with pellets from my kids pellet guns. Some of the
deck cabling is really a guitar string from my son's guitar. His guitar sounds a bit
strange now but they made great cables. Other assorted things laying around the garage and
found in "junk boxes" ended up as "scale detail items" on the model.
My original intention when I started this model was to make everything from scratch. As each group of items to create became smaller and smaller, my intention changed. My patience was wearing out. I wanted this model finished. The thought of spending the next year making a couple of a hundred items, (most of them smaller than the buttons on my TV remote), did not look as appealing to me as it did when I started this model. I decided to start purchasing the small detail items I wanted. First I tried the local hobby stores to find AA guns, ammo boxes, deck hatches, chocks, bits, and all that stuff. Here in Salem Oregon, there is not much selection for boat parts, Lot's of R/C airplane and R/C car supplies but no boat supplies.
So I started the "Mail Order" route. Over the last two years that I have been involved in this hobby, I had mailed request for catalogs from every vendor of interest I had come across. Now it was time to try them out. I ordered a few items from assorted suppliers to see what their quality and service were like. Wow, what an education. I never realized how many adds that look like sizable outfits turn out to be some little hobbyist who then orders the parts you want from someone else and maybe a few months later you might get something. If someone were to ask me for my op on mail order, I would suggest two things. (1) if the vendor does not have a phone number to call and check up on your order, don't order from them! (2) If they don't take credit cards, their whole business is probably located in their spare bedroom.
One of my better purchasing experiences was from John Seaton, the then new owner of H&R Scale Model Ship Fittings Products in McHenry, Illinois. The service was fast. Each of the three times I ordered from him, the package was in my mail box 10 days from the day I mailed the order. I talked to John a couple of times on the phone and found the new owner very helpful and easy to work with. I like the way he packages his parts for shipping. Each item was very well protected and individually packed. I accidentally ordered some parts that I did not actually need. H&R let me return them in exchange for some other items with no questions asked.
I also found M.A.C.K Products of Long Branch, New Jersey very fast in sending their products. They gave me a lot of helpful information over the phone regarding my stuffing boxes, what propellers and motors to use. In addition, M.A.C.K takes credit cards so I did not have to "Send Money First" like many people I tried to deal with required.
But my best purchasing experience is when I went back to my local hobby store (Leisure Hobbies, Salem Oregon) and had them start special ordering the parts that I needed. They were usually able to get whatever I needed fast and less expensively than my mail-ordering experience. Gene, the owner, always answered my questions and gave good advice on what to get or how to solve a problem. Moreover, I think it is important to support your local hobby shop. We need them!
The Crew
As stated earlier in the article, my desire was to create the model to represent
the way the USS NEWPORT NEWS look the morning of our gun turret explosion. To do this, I
would need crew members all over the place. There would need to be the damage control
crews doing their job, medical staff finishing loading the last of the injured onto
helicopters, and other crew members running around.
I looked everywhere for 1:144 scale crew members for my model. In this scale, a 6ft man would be a �" high figure. No where could I find the right size figures. I settled for using Railroad "N" gage scale figures. "N" gage is 1:160 scale so that means the figures are equal to about a 5' 2" person in 1:144 scale. Oh well, close enough. I bought railroad crew men, and some construction workers and painted them to look like navy sailors. I also bought some police officers and some mail men and painted them to look like navel officers. From a couple of ambulance crews sets, I got the corpsmen, stretchers and other medical props I needed.
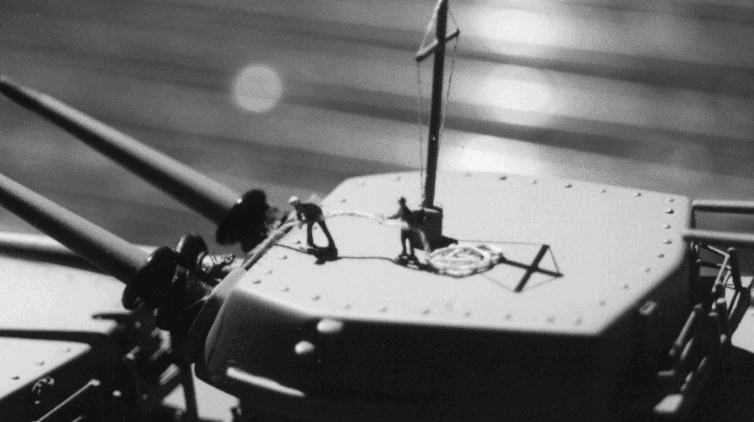
I used these figures to create 2 dioramas representing what was happening that morning of Oct. 1, 1972 at sunrise. The first diorama was the damage control crew bracing up the 8" barrel that had exploded so that it would not fall completely out of the turret and crash through the deck. You can observe from the pictures the crew members carrying post to create a brace for the damaged barrel with a couple of guys on top of the turret tugging on a rope attached to the top of the post and pulling it into place.
The other diorama is the area of the ship that I was located at that morning. It shows us (medical staff) working with the last of the injured and carrying then on stretchers to the Medevac helicopters.
Railing, Painting and Closing notes. Railing
One of the most time consuming bits of detailing I did was the railing. I used
Styrene plastic for both the post and the railing. 338 posts were made out of 3/64"
rod stock and the 42 feet of railing used on this model was made from .015 x .020 strips.
Painting each post gray and painting each rail white turned out to be a long process!
Working with Styrene is very easy but breaking it is very easy too! Often I come back from
a day of boating with the need for some railing repair.
Painting
The USS NEWPORT NEWS was not painted in combat colors during the Vietnam era. Since
Vietnam was not really a war (remember, we were just pretending to want to win that war)
the ship maintained its peace time color of light gray. I never imagined how hard it would
be to decide on what color "Light Gray" is! After a couple of coats of primer
was applied, I sprayed the hull with a couple of different "inexpensive" grays
you get at the hardware store. I could not find a shade I liked so I went to the hobby
store and started buying cans of assorted grays to try them out. I finally found the color
I wanted. Testor's Model Master "camouflage gray." I sprayed a couple of coats
on then repainted from the waterline down using X-O Rust Red Metal Primer. It looked
really good, I thought. When I took it out on the water, (shake down cruises after the
hull was completed and before the superstructure was complete) I realized why they call it
"camouflage Grey". On a sunny day, once the ship gets about 10 feet away from
shore, it becomes very hard to see! The farther away from shore you get, the more
invisible it became! A couple of times I would turn my head away from my model to talk to
someone and when I turned back to check my model, it would take a while to find it, this
made me nervous so I decided to use a darker gray.
This time I tried Testor's "Navy Aggressor Gray," a couple of coats of this color plus repainting below the waterline with 'Red Metal Primer' and back to the water again. No comments regarding my "funny color" so it was a keeper. Wrong . . . I made a few modifications on the hull again after the finial paint job creating the need to repaint it again. I must have more than $75.00 worth of paint just on the hull of this ship! The hull is about 1/8 inch thicker than planned because of all the paint! Luckily, I decided on my finial shade of gray before the superstructure was very far along so I did not have to repaint it as much.
I painted the deck 'dark tan' to simulate the wooden deck of the USS NEWPORT NEWS. I also used 'dirty paint thinner' to weather the bilge pump holes on the side of the ship, gun turrets and other areas of the ship.
When I was finished with the painting, I felt "it looked too clean" for a ship that had been in combat for the last 9 months. I remember the ship looking very battered that morning back in 1972. But, after a full summer of heavy cruising this model in sunshine and in storms, it weathered up very good.
In Closing
Finally the model was finished. If anyone is interested in building the USS NEWPORT NEWS,
I would be happy to share my research and pictures with you.
Just E-mail me.
Also I would like to thank my friend,
Craig May for taking most of the photos used in this article.
My next project is going to be another ship I was stationed on, the USS Savannah
AOR-4, a Navy Oilier/refueling ship. I was not in the picture taking mood during my stay
aboard this ship so I have no personnel pictures. I can not find anything listed anywhere
in the catalogs so if anyone has information or pictures, I would love to hear from you.