![]()
|
|
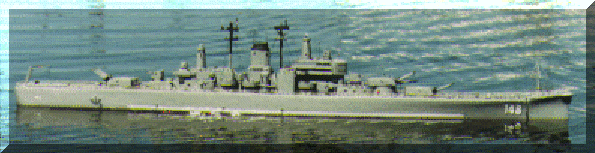
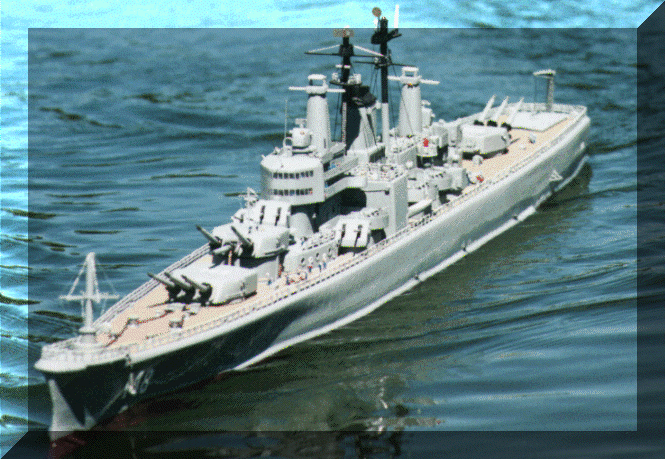
Building the USS NEWPORT NEWS in 1:144 scale. Part I of 3
History of the Ship This class of cruisers carried nine of the world's first fully automatic 8"/55 caliber gun turrets able to fire three times quicker than previously built 8" guns. These 8" MK16's had a "rate of fire" of 20 shells per minute, per gun (Nine 8" Guns times 20 shells per minuet equals 180 shells per minute. Add the twelve 5" guns that could fire even faster and you have a lot of fire power!!) Also, for the first time on a heavy cruiser, the newly introduced 3"/50 Anti Aircraft (AA) guns were a standard installation. The NEWPORT NEWS started with 10 pairs of these AA guns when she was commissioned. That number was reduced down to six pairs by our cruise in 1972. Another reduction in arms from the original armament was the Twelve 20mm guns had been reduced to six by the time I served on her. Gun performance was enhanced with two MK54 directors for the 8"/55 guns and four MK37 gun directors for the twelve 5"/38 caliber guns. Originally, each ship had aircraft catapults and search planes when commissioned but they were soon replaced by helicopters. Then, in the early 70's, two batteries of anti missile rockets were added to complete this dreadnought's combat capabilities. The USS NEWPORT NEWS was commissioned four years after World War II had ended. Though she missed "the big one," she was very active in most "Hot Spots" during her 26 years of service. She saw heavy combat in both the Korea War and in Vietnam. To briefly mention some of her more notable activities, she helped with the Syria Crises in 1957, rescue work during the Aqadir earthquake in 1960, the San Domingo crisis in 1961. The Newport News became the flagship for 'COM Second fleet' and then provided fire power in for the blockade of Cuba in 1962. In 1965 she as active in the San Domingo crises again then went on her first tour of Vietnam in 1967 in which she served as flagship. In 1972 she served again as flagship in Vietnam and finally decommissioned in 1975.
Secrets of building the best possible ship. I became involved with this hobby because I was out at a pond in Portland, Oregon one day and ran into these men playing with toy boats. They called themselves the "PORTLAND MODEL POWER BOAT ASSOCIATION." They were so friendly and were glad to answer any questions I had. Heck, they answered a whole bunch of questions I didn't have! While watching these men playing with their toys, and asking the standard question all visitors ask, a club member named George Pobi handed me his transmitter for his 5-foot model of the USS Wedderburn destroyer and said "here, try it out." I navigated it around for a while and I became hooked on the hobby from that moment on. I went down to the local hobby store and bought the Lindberg 'PT 109' kit and was now a R/C Boat Model builder fanatic. The valuable part of being in a club is the knowledge that the club members were willing to share with the new hobbyist. Their advice and information helped me avoid many errors I would have experienced if I had tried building this ship with my limited knowledge and experience. I know that getting started in this hobby would not have been near as much fun if I had not had other, more experienced model ship builders guiding and encouraging me along. Even the monthly club meetings where we get together and argue over club money and club policies are entertaining! More important, this is the time where new skills and old tricks are exchanged among the members.
Research and design stages Next I purchased a book called "CRUISERS OF THE US NAVY 1922-1962" by Stefan Terzibaschitsch. This book appears to me to be invaluable to anyone creating a model of cruisers in this time period. This book contains details of design, the history of these ships, technical data lists and more than 400 photographs and line drawings. I also purchased plans from assorted suppliers and found that some ship drafters have a bizarre idea of what is scale. The best plans were from "WARSHIP DRAWINGS" by Edward M. Wiswesser that I purchased from TAUBMAN PLANS SERVICE. Next I started putting all this information together and created an outline of the steps to take in each stage of this project. Being fairly new at this hobby and this being my first attempt to build a scratch built ship, I admit I was really doubtful that I could do it. Knowing that I did not have "ship design" and "scratch building" experience, I decided to use my computer to help me substitute my lack of modeling experience. I turned on my computer, went into a simple graphic's design program and created a top view drawing of this model in my computer. The idea was to get my model into an environment that I could experiment with before actually starting the construction. I drew, in my computer graphics software, the hull to scale using the plans I had received. Then I created scale pictures of my motors, speed controls, servos, receiver, switches, batteries, bilge pump and accessories individually so that I could move them around in my computer to find the best locations for each item. Once I had the hardware placed, I then relocated the bulkheads each a little forward or back to best fit all the items that I would be installing inside the hull. This helped me to avoid the problem of building the model and then trying to fit the hardware between the bulkheads, finding that "If only I had placed this bulkhead �" further aft, the motors (or whatever) would have fit so much better." Next I drew my stuffing boxes into place which allowed the computer to give me the exact measurements needed to properly cut the stuffing boxes to fit perfectly between the propellers and the motors. Creating the ship in my computer also helped me plan out exactly what steps to take in building the ship and made the model clear in my mind on what I needed to do. Although this process took a few evenings to complete, many design problems were brought to my attention through this process and were solved before I even laid the keel. Building the model. Building the skeleton. The keel and bulkhead's were cut out
of 3/8" AC plywood. I planned to have the bulkheads serve some additional purposes
besides just being the skeleton of the ship. First I wanted them to be "damage
control compartments", incase of water leaking into the hull. Bulkhead "C"
located about 5 inches from the solid bow section and bulkhead "H" about 6
inches from solid tail section, were left totally solid so that no matter how much water
might get in, it would never get past these bulkheads as long at the deck is above water.
A rectangle shape was cut out of the rest of the bulkheads from the waterline up. By
leaving the bulkheads solid from the waterline down would keep reasonable amounts of water
from spreading past that section of the ship. I was very proud of myself to preplan this
protection feature into my ship. What a waist of time! I have floated this model more
times than I can count and the only time water succeeded to find it's way inside the ship
was when I was floating in a storm that no sane R/C hobbyist would be out in and waves
were persistently slopping over my deck and superstructure. All that time and effort
building this safety feature into my model has so far been a waste of time. Oh well, maybe
I will be lucky and some other modeler will ram into me someday and the "flood
control" bulkheads will come in handy! One can only hope. The top brace had a distinct purpose. Beyond being a brace for the hull, it was also the deck foundation. I wanted the complete deck to be removable to allow me full access to the interior of the ship. To do this, I designed a "shelve" all the way around the hull for the deck to set on. I glued a 1/8" 'quarter round' dowel onto a 3/8" 'half round' dowel to make a 'three quarter' round dowel. Placing this 'three quarter round' brace into the round notch made in the top corner of each bulkhead, with the open section toward the inside of the ship made the shelving I needed to place my 1/8" decking on. The 3/32 basswood I used for planking this model, fitting up snug to the out side of this custom dowel brace and with some sanding, made a nice round top corner around the outside of the deck. Before starting the planking, I carved the bow section and the aft section out of basswood blocks and glued/screwed them into place. The planking was fun. I think I got a bit carried away in custom cutting and fitting many of the pieces but I had a great time doing it! After completing the planking came many hours of sanding, puttying, sanding, puttying and sanding. Next came mounting the stuffing box, rudder outlets and bilge pump outlets. Bond-O'ing these in place and sanding them smooth. After this step was finished, I applied fiberglass resin, sanded, more fiberglass resin, sanded, resin, sanding, risen, sanding and more sanding. When I was finally done with this stage, I had a hull with a finish as smooth as steel and I was sick and tired of sanding! A few coats of primmer, some more sanding and a few coats of gray paint and the hull looked quite good. "To scale or not to scale, that is the question." Second, I made my rudders a bit larger than scale to help with maneuverability. Since both of these non-scale changes were below the waterline, no one will ever know (except all your readers of "Scale Ship Modeler Magazine"). After running the finished model and seeing the results, I am very glad I made both of these "exceptions to scale" modifications. |
|
|